Do you know the difference of APA102, APA107,HD107s and SK9822?
APA102: 20+ kHz PWM.
APA107: 9 kHz PWM.
HD107s: 26+ kHz PWM (the upgrade of APA107).
SK9822: 4.7 kHz PWM.
In conclusions, APA107/HD107s  is one real product which can replace APA102.

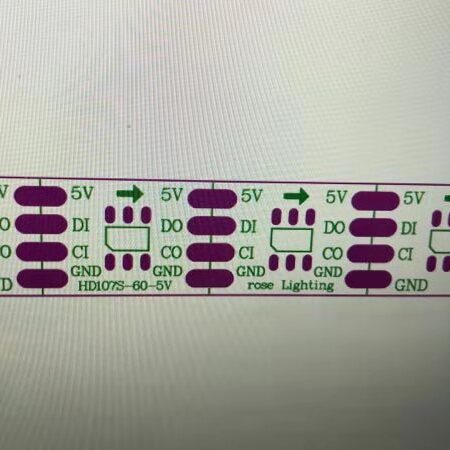
HD107s pixel led chip with PWM refresh Rate 27KHZ and transmission rate 40MHZ
Apa107 pixel led chip with PWM refresh rate 9KHZ and transmission rate 30MHZ
original apa102 pixel led chip with PWM refresh rate 20KHZ and transmission rate 20MHZ (Gone)
app102C (made in china ) (fake apa102)
sk9822 pixel led chip with PWM refresh rate 4.7KHZ and transmission rate 15MHZ (fake apa102)

Now let us introduce some different types of LEDs,

The AllPixel supports all the popular LED chipsets and a bunch of the not so popular ones. The most common ones you will see are:

WS2812: A 1-wire interface chipset, integrated directly into either an SMD5050 or 8-12mm through-hole LED. Typically the cheapest option, but slow data and PWM rate. There are many variants that all use the same protocol:
NeoPixel: Adafruit’s brand name for all of this type of LED
WS2812B: The 4 pin variant of the SMD5050 package (which originally came with 6 pins as the WS2812).
WS2811: Bare-IC variant typically used for Christmas style lights and 12V strips (3 RGB LEDs per IC)
WS2811 400kHz: Original version of the chipset that runs at 400kHz, unlike all newer versions that run at 800kHz. You must use LED TYPE.WS2811_400 when using this variant. These are rare now.
SK6812: A knock-off, related to the APA102 but uses the WS2812B protocol.
APA107: Our current favorite and “New Kid on the Block”. The chipset is integrated into an SMD5050 LED like the WS2812 but uses a 2-wire interface instead and supports up to 30Mbps and a whopping 9kHz PWM rate. Newstar’s patent design.
HD107s: the upgrade of APA107, with PWM refresh rate of +26 kHz.
LPD8806: Oldie but still a goody, this chipset is a 2 wire interface that can manage 20Mbps and high PWM rate. The downsides are that each IC controls 2 LEDs and it only has 7 bits per channel instead of 8 so it can only handle 1/8th as many colors.
WS2801: Mid-price, 2-wire interface with great 8-bit per channel color but only 1Mbps data rate and decent, 2.5kHz, PWM rate.
Those are the main chipsets that you’ll come across on the market, if you are using one of the others supported by the AllPixel, you likely know exactly why you are using it over the other options.

The AllPixel provides 4 connection pins for hooking up your LEDs:

Note: Your LEDs may not have the same pin ordering!

  • V+: Power output. Typically 5V but up to 12V supported for LEDs that require it. Required if powering via USB or the onboard power jack. But can be left disconnected if power is connected elsewhere.
  • GND: Common ground. Even if not using USB or the power jack on the AllPixel for power, this connection is required so that the DATA and CLK pins have a ground reference.
  • CLK: The clock pin for chipsets that require clocked data. Refer to the table below to know if your chipset requires it.
  • DATA: The pixel data output pin and required by all chipsets.
Basically, all chipsets will either have 3 or 4 connections. 2 are always for ground and power. If there are 3 total wires, only DATA is required but if there are 4 wires, both DATA and CLK are required.
See the following table for details on which pins are required, which LED TYPE to use with the BiblioPixel software library, and other chipset specifications.
Note the R6 and R7 designations on DATA and CLK these are the resistor/jumper pads mentioned in the Optional Components section.
If there is a check in the column than that resistor must be installed or the pad must be jumped.
The resistors are intended mainly for the WS2812 chipset but we’ve found there’s no harm in installing them for all chipsets.

Tip: the HD108 LED chip with 16 bits(65535 grayscale) will on market soon 
(which is the updated version of  HD107s with fastest pwm refresh rate:27kHZ .

Chipset Choice Considerations

For a lot of projects, just about any chipset will do and you can go with the cheaper WS2812 or APA102. But certain applications require making the right choice.
First, note that maximum frame-rate will depend on the number of pixels you are trying to control. All chipsets can achieve 100+ FPS if only controlling a few pixels, but if you are using the maximum of 700 that the AllPixel supports,
that can drop to < 20 FPS for some of the chipsets with lower data rates. If pushing as many frames as possible is a concern, APA102, LPD8806 and P9813 are great choices because they all support data rates greater than 1Mbps.
Second, if your display will be moving or you want to use it in the persistence of vision display, like our POVStick project then you need a chipset that supports a high PWM rate.
Lower rates will be visible as a flicker when the display is in motion. LPD8806, WS2801, P9813, and especially APA102 are all good options for this.
WS2801 won’t be able to have as high of a frame-rate, but won’t show flicker. LPD8806 and APA102 are by far the best options for this application.
Power
Most LEDs will require 5V and, in general, you can calculate the maximum current draw as 60mA per LED when lit up full white. But that is just a maximum that you should design for when choosing a power supply.
In practice, it’s rare that the draw ever reaches that theoretical maximum, as the power draw heavily depends on what is currently being displayed. There are 3 main ways you can provide power to your display:
  • DC Barrel Jack: Using the optional DC Barrel Jack you can provide up to 5A of current directly from the AllPixel using any power supply with a 2.1mm, positive-tip, connector. Using this jack it is possible to power LEDs requiring up to 12V as long as they still support 5V logic. Note, however, that there is a voltage drop over the length of LED strips and a good rule to follow is to inject power a least every 5 meters or 5A of current draw, whichever will likely come first. Using the AllPixel PowerTap is a great way to do this.
  • Manual Hookup: You can “roll your own” and wire power to your display however necessary. But just remember that you must always connect the GND pin on the AllPixel to the ground of whatever power supply you are using.
  • USB: For 5V strips, it is possible to power a small number of LEDs directly from the USB connection. Depending on the animation, this could be as many as 100 pixels. To do so, you must install the USB Power Diode. This will allow you to source up to a little over 400mA to the LEDs (the AllPixel requires about 65mA itself). If you go over this limit, the built-in poly-fuse will automatically trip before any damage could be done to your computer. If this happens, just unplug the AllPixel and the fuse will reset within a few minutes. To help decrease the current draw when using this power method, we recommend decreasing the master brightness in software like so:

Thanks for attention